About Me

My photo
IN, United States
I love the Lord and my big crazy family. My husband and I have been together for 44 years. I am a mother of two grown children and a grandmother to four biological grandchildren and 5 others. Many sites have been sold or did upgrades which messed up back links, if you find a broken link let me know and I will fix it.I have written online articles for Bubblews, Seekyt, TopicSpotter and Triond. You may still find some of my articles on Ehow/Demand Studio.

Wednesday, October 21, 2015

Himalayan Salt Eye Drops


Himalayan Salt Bowl

Himalayan salt eye drops are a crucial element for today’s technological world. Many people suffer dry eyes and use over the counter eye drops constantly. Have you ever considered your dry eyes are due not only from the environmental and age factor but also with all the electronic devices in our home? Our eyes need good eye drops, such as Himalayan salt eye drops, to keep our eyes hydrated.
According to Lee Swanson, president of Swanson Health Products, Dr. Barbara Hendel studied medicine at the Ludwig-Maximilian University in Munich, Germany, and brought to America Himalayan salt crystals and all the benefits. As Hilde F. Bschorr, owner of Himalayanlivingsalt.com, explains, "a Himalayan Salt/water solution can alleviate these problems and can even reduce impaired eye-sight due to old age, when applied regularly over a long period of time."
According to Wikipedia the Polish physician Dr. Feliks Bopczkowski, was a physician in the polish salt mines at Wieliczka, he recorded in 1843 that the miners there did not suffer from lung diseases and his successor set up a spa based upon these observations. The modern day use of salt therapy started in Germany when Dr. Karl Hermann Spannage patients noticed health improvements when they escaped from heavy bombing and hid out in caves.
Traveling to Europe for your health, or to purchase Himalayan salt, to make eye drops is no longer required. You can purchase Himalayan salt online from suppliers, such as, Swanson’s Health or many health stores in your area. The demand is getting greater making it easier to find.

Supplies for Himalayan Salt Eye Drops:


  • ¼ tsp. to 1 tsp. Himalayan salt crystals granulated or salt rock
  • 100 ml/3.4 oz lukewarm water; distilled or filtered water
  • Eyewash cup
  • Glass container
  • Glass bottle with an eyedropper

Instruction to make Himalayan Salt Eye Drops:


  1. Prepare the solution by dissolving ¼ tsp Himalayan granulated salt in 100ml/3.4 oz of lukewarm water. 
  2. If you prefer to use Himalayan salt rocks instead, follow directions on Himalayan Living Salt to make the solution, using one tsp. in 8 oz of lukewarm water. "The salt binds the water, and the eyeball regains its natural form," Bschorr explains. . "This concentration ... does not burn or sting your eyes because it equals the salt concentration of your tear fluid."


Using Himalayan Salt Eye Drops:


1.     Remove all make-up before using the sole solution to wash your eyes. Pat your eyes dry with a soft clean towel.
2.     Fill the eyewash cup approximately ½ full; hold the cup close to your eyes letting no liquid escape.
3.     Tip your head back letting the sole solution saturate and wash your eye. Repeatedly open and close your eye followed by rolling your eye around for several minutes.

Alternate use for Himalayan Salt Eye Drops:


  • Use as a daily eye drop by making your 1 percent solution with granulated Himalayan salt crystals and storing in a glass bottle with an eyedropper. 
  • If in doubt what 100 ml/3.4 oz of water is, use slightly more water.

Amish Drop Sugar Cookie Recipe

With the holidays right around the corner, people are baking cookies for family and friends. If you are one who will be baking cookies, you might consider the Amish drop sugar cookie recipe.
Unlike some sugar cookies, these are easy to make and soft and delicious. Amish drop sugar cookies start with real butter, which is so much healthier than margarine and shortening containing hydrogenated oils. Hydrogenated oils have trans fat that can lead to heart disease, cancer, bone problems plus so many other health problems and diseases.

Good cookie recipes such as the Amish drop sugar cookie recipe start with real butter. Not only are they healthier, provided you do not eat the whole batch, they simply taste better.
According to Mercola.com butter is better than imitations because; “Butter is a rich source of easily absorbed vitamin A, needed for a wide range of functions, from maintaining good vision to keeping the endocrine system in top shape. Butter also contains all the other fat-soluble vitamins (D, E and K2), which are often lacking in the modern industrial diet.”
Both Dr Mercola and the Mayo Clinic agree that butter is better than hydrogenated margarines or shortenings, as they are contain trans fat, which leads to heart disease, cancer, bone problems so many other health problems and diseases.
“When it comes to fat, trans fat is considered by some doctors to be the worst type of fat. Unlike other fats, trans fat — also called trans-fatty acids — both raises your "bad" (LDL) cholesterol and lowers your "good" (HDL) cholesterol. A high LDL cholesterol level in combination with a low HDL cholesterol level increases your risk of heart disease, the leading killer of men and women.” Therefore, when baking cookies for your family and friends, consider making your recipes a tad healthier yet still delicious.

Ingredients needed for making Amish drop sugar cookie recipe:


  • Non-stick spray
  • Baking sheets
  • 1 ½ cups sugar
  • 1-cup butter
  • 2 eggs
  • 1 cup sour cream or yogurt
  • 2 tsp baking powder
  • 1 tsp baking soda
  • 3 ¾ cups all-purpose flour
  • 1 tsp vanilla
  • Sprinkles or colored sugar


Instructions on making Amish drop sugar cookies:


  1. Preheat the oven to 375 degrees Fahrenheit.
  2. Prepare the baking sheets by spraying with a non-stick spray.
  3. Cream together the sugar and butter; add the eggs and beat well.
  4. Add in the sour cream or yogurt, baking powder, baking soda and vanilla; little by little add the flour and beat until completely mixed.
  5. Drop by teaspoonfuls onto the baking sheets.
  6. Sprinkle on the cookie dough, candied sprinkles or colored sugar.
  7. Bake at 375 degrees Fahrenheit for 8-10 minutes.


 If you are one that will be baking cookies for Christmas, consider my recipe for Amish drop sugar cookies.
 

Monday, October 19, 2015

Fall Break for our Grandsons


Grandson #2 and Po

Well it is fall break for our grandsons, which means while our son is at work, I get to see the boys; well at least I thought that was how it was going to go.


I arrived this morning, however, instead of leaving I told the boys they could sleep in and I would stay in town until Bible Study. Well 1 ½ -2 hours went by before the youngest emerged with tablet in hand, saying good morning and asked how long I had been here. It then took a few more minutes before grandson #2 came out to wish Po and I a good morning.


I did not see grandson #1 until I needed something in the kitchen to make breakfast and could not find it, however, they all retreated quickly to the dark bedroom. When brunch was done, they all came out and then took it back into their rooms. Seriously, what is the attraction of a dark room?
Grandson #1 in tree house

With the weekend temperatures so cold and windy and the temperature being 63 degrees today I thought they would want to be outside but I was wrong. I hope they enjoy it today as tomorrow I will pick them up, head to the gym and then to the Farm. Well it is not really a farm but we are in an old farmhouse surrounded by fields. Anyways, it is to be 72 degrees with sunshine and that will be enough for me to want to hit the outside and take in some natural vitamin D3. Besides, I do not have cable TV or a dark room for them to retreat too; therefore, I hope they are enjoying the seclusion.


With all seriousness, they have been in their room a lot but I have seen them a few minutes this afternoon to talk. Dad is on his way home so they will come out to be with him. I guess after all it is their fall break.

Sunday, October 18, 2015

Mushroom Burger: the Recipe


The mushroom burger is technically a vegetarian burger; however, anyone and everyone can eat and enjoy it. Mushroom burgers are a great change of pace, yet also good, for people who either do not eat red meat or want to limit meat in their diets.
Having burgers made with assorted antioxidant packed mushrooms, as well as cholesterol fighting oats, makes for a one two punch for a healthy meal.
According to World’s Healthiest Foods, One cup of Mushrooms is low in calorie yet filled with 32.3 % selenium, 25.2 % Vitamin B2, 21.5 % copper, 16.5 % vitamin B3, 13% vitamin B5, 10.4 % phosphorus, 6.4% zinc, 6% manganese, 5.3 % vitamin B1, 4.5 % Choline, 4.3 % protein, 3% folate and 1% calories.
One cup of Oats contains, 68% manganese, 18 % selenium, 18% phosphorus, 15.9 % fiber, 15.7 % magnesium, 15.6 % zinc and a mere 9% Calories.


Ingredients needed for the Mushroom Burger: the Recipe


  • Olive oil
  • 1 small onion; finely chopped
  • Salt and pepper 
  • 1-teaspoon chili flakes 
  • 1-1 ½ lbs chopped assorted mushrooms; such as Portobello; Crimini aka Baby Bella; Button; Shiitak
  • 6 garlic cloves; minced           
  • 1 ¼-cup quick cooking oats 
  • ¾ cup grated Parmesan  
  • ½ cup grated carrot 
  • 2 eggs; beaten
  • 1/3 cup parsley; finely chopped
  • 1 tablespoon fresh oregano; finely chopped
  • 6 cheese slices of choice
  • 6 buns

Steps to make the Mushroom Burger: the Recipe

  1. Add 3 tablespoons of olive oil to a large sauté pan over a medium-high heat add the onion and toss to coat, season with a large pinch of salt, black pepper and chili flakes. Cook the onions for 3 to 4 minutes then add in the mushrooms and garlic, you may need to add more oil if the pan seems dry. Cook for an additional five minutes, or until the onions are soft.
  2. Pour the mushrooms and onions into a large bowl. Stir in the oats, Parmesan cheese, carrots, eggs, parsley, orex well angano, salt and pepper. Mid form into six mushroom burger patties.
  3. Heat a large sauté pan over medium high heat and add 3 tablespoons of olive oil. Carefully put the patties in the pan, working in batches if necessary so as not to overcrowd. Cook on each side for 3 to 4 minutes, or until golden brown. In the last minute of cooking, add a slice of cheese to each mushroom burger and serve up on your favorite bun.
  4. If you do not have, or use fresh herbs, dried parsley and oregano will work just fine. As you add the dried herbs to the Mushroom Burger, you use 1/3 the amount of dried to fresh ratio and pinch it between your fingers to liven up the flavor.

Wednesday, October 14, 2015

Frozen Chocolate Covered Banana on a Stick

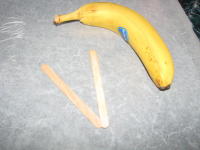
Frozen chocolate covered banana on a stick are so nutritionally packed and great on hot summer days. If you have a hard time getting your children or grand children to eat enough fruit you may try offering them frozen chocolate covered bananas. Even our fussy grandson loves them, in fact the only reason I made frozen chocolate covered bananas was that he requested them.

Bananas, the high-energy fruit, have vitamin B6, C and potassium in them making them a very low calorie nutritionally packed fruit. According to the world’s healthiest food, “Bananas are one of our best sources of potassium, an essential mineral for maintaining normal blood pressure and heart function. Since the average banana contains a whopping 467 mg of potassium and only 1 mg of sodium, a banana a day may help to prevent high blood pressure and protect against atherosclerosis.”
Thanks to the discovery by George Washington Carver, we can enjoy the high protein nutrient packed peanut butter. Enjoyed by all, peanuts or peanut butter is consumed by shelling and eating them at ball games or as simple as a PBJ sandwich.
Combining all the goodness of chocolate, bananas and peanut butter to make this cool treat just makes sense to me.

Ingredients needed for making frozen chocolate covered bananas:

  • Bananas
  • 1-12 oz package dark chocolate chips
  • 2 or 3 tbsp peanut butter; natural, crunchy or smooth
  • Wax paper
  • Popsicle sticks
 

 Instructions needed for making frozen chocolate covered bananas:

  1. Purchase bananas that are ripe but not overly ripe. Getting a firm but sweet banana is necessary.
  2. Peel the bananas and depending on the size, cut into 2 or 3 pieces. Insert the stick about ½ way. If you insert it to far the banana may break and if not inserted far enough it will fall off the stick when dipping. You will get the feel for it after the first attempt.
  3. Melt the dark chocolate chips. You can melt in the microwave or on the stovetop, however I find using a double boiler system to melt the chips is the best way to control the texture. Add the peanut butter of choice. Some might prefer to use the natural peanut butter that has no salt and sugar added, some might prefer chunky or smooth. There is no right or wrong.
  4. Dip the banana in the chocolate mixture and gently move it around to make sure it is covered.
  5. Shake the excess chocolate off the banana and put it on the wax paper.
  6. After you have dipped the bananas in the chocolate mixture, place them in the freezer.  My grandson and I really love them. Mine may not be as pretty as the carnival chocolate bananas; however they still taste good; I am not sure why I had not tried them before. 


    Tips on making frozen chocolate covered bananas:

  •  You might have to thin your chocolate chips, the bags recommends using solid shortening.
  • Do not over heat the chocolate; it will dry out instead of melting. Slowly melting the chocolate is better.
  • If frozen bananas are not your thing, try putting them in the refrigerator to chill long enough to set up the chocolate.
  • On these hot summer days, I hope you try this delicious recipe for frozen chocolate covered bananas.

Pumpkin Cheesecake Dip: Fluffy and Delicious


 Growing pumpkins in our as close to organic garden as you can find, I have used them in many ways from pumpkin soup, pumpkin pie, pumpkin bread, pumpkin black bean burgers and now pumpkin cheesecake dip which is fluffy and delicious.

First seeing the recipe for pumpkin cheesecake dip on facebook, I instantly clicked on the link for the recipe. I scanned it and saved the page. While I was at work, Mozilla shut down and I lost my page.

I started searching pumpkin dip and realized there were many versions; however, I ended up combining two recipes to incorporate the ingredients I remembered. Now while my fresh cooked pumpkin is not as thick as the canned stuff, I will continue to use it as I know where these pumpkins come from and how near organic they actually are.

Pumpkin Cheesecake Dip

Ingredients for Pumpkin Cheesecake Dip: Fluffy and Delicious


·       1 8-oz package cream cheese; softened
·       2 cups of powdered sugar
·       1 tsp Orange Juice
·       2 cups of fresh pumpkin or 1 15-oz can of pumpkin
·       1 tbsp ground cinnamon
·       1 tbsp pumpkin pie spice
·       1 8-oz container of whipped topping; thawed


Instructions to make Pumpkin Cheesecake Dip: Fluffy and Delicious


  1. In a medium bowl or blender, combine the softened cream cheese, powdered sugar and orange juice until smooth.
  2. Gradually mix in the pumpkin whether you use fresh cooked or canned.
  3. Add the cinnamon and pumpkin pie spice and blend until smooth.
  4.  Fold in the thawed whipped topping.
  5.  Chill the pumpkin cheesecake dip until serving with apples, crackers or cookies.
Alternate recipe for Pumpkin Fluff Dip Recipe:

  • 1-15 ounce can of pumpkin
  • 1-16 ounce whipped topping;thawed
  • 3-small boxes of vanilla pudding
  • 1-3 tsp of pumpkin spice; spice to personal taste

Saturday, October 10, 2015

Baking Sweet Potatoes in the Microwave

Sweet potatoes from our garden
Baking sweet potatoes does not have to be an elaborate process; they can be easily baked in a microwave. Sweet Potatoes are available all year long, taste great, low in calories, high in vitamin A and C and good for you.
According to Worlds Healthiest Foods, “Sweet potatoes contain a wealth of orange-hued carotenoid pigments. In countries throughout Africa, in India and in the Caribbean, sweet potatoes have been shown to be a highly effective way of providing school age children with sizable amounts of their daily vitamin A. In some studies, sweet potatoes have been shown to be a better source of bioavailable beta-carotene than green leafy vegetables. Because sweet potatoes
are available in many countries on a virtual year-round basis, their ability to provide us with a key antioxidant like beta-carotene makes them a standout antioxidant food.”


Things you will need to bake a sweet potato:


  • Sweet potato
  • Butter
  • Salt and Pepper
  • Paper towel 
 

Instructions to bake a sweet potato in the microwave:


  1. Wash the sweet potato; you do not know who handled it in the store. For us, ours came out of our garden, however, it still needs washed.
  2. Take a paper towel or two and wet it down.
  3. Wrap the sweet potato in the wet paper towel and place the wrapped sweet potato in the microwave.
  4. Our microwave has a button for baking potatoes. Use the 2-potato setting.
  5. After baking the sweet potato, carefully remove it from the microwave and cut it in half.
  6. Spread butter on the sweet potato and sprinkle with salt and pepper. Sweet potatoes are so good and good for you.

Tip:

Microwaves vary it may take more or less time depending on your microwave and sweet potato.

Friday, October 9, 2015

Gluten-Free Apple Crisp Recipe

It is apple time once again and as in the last few years, the neighbor is not using any of them, therefore, the taking is all mine. 

I have picked and juiced, took a truck load of apples to our daughter to juice, given some to the church's soup kitchen and given apples to family and friends.

Now having fresh un-sprayed apples at my disposal means baking some too, and apple crisp is a family favorite.
Ready for the oven


Yep you guessed it, this is how much I love my family that have a gluten intolerance, it is gluten-free apple crisp with freshly picked and sliced apples ready to hit the oven. I think I will wait until tomorrow to bake it or it might be gone before I get to the fall family get together. 

Ingredients for Gluten-Free Apple Crisp:  

  •  9-inch x 13-inch baking dish 
  • 10-12 large apples; sliced thin
  • 1-cup of white sugar
  • dusting of apple pie spice

topping:

  • 1-cup butter, slightly melted
  • 2-cups of brown sugar
  • 2-cups of all purpose gluten-free flour
  •  cinnamon, optional
Hot out of the oven!

Instructions to make Gluten-Free Apple Crisp: 

  1. Preheat the oven to 325 degree Fahrenheit.
  2. Taking the 9-inch x 13-inch baking dish evenly spread out the apple slices. 
  3. Cover the apples with the white sugar and sprinkle with apple pie spice.
  4. Combine, butter, sugar and gluten-free flour until you  have a moist yet crumbly mixture.
  5. Spread evenly over the apples and sprinkle with cinnamon if desired.
  6. Bake 1 hour in a 325 degree oven.